_files/image001.jpg)
Dear TRAXsales valued customer,
Very rarely do the traffic counters fail but if they ever do you need to know what to do and how to resolve the issue quickly. First of all, any traffic counter has a permanent memory in the PC, and each traffic counter has a four day internal memory; even if the PC fails completely.
It is our goal to make TRAX very easy to use and enjoy. It is our experience that once set up properly our traffic counters will give you many years of faithful uninterrupted service.
We have found that when dealing with a large dealer with many locations it is more productive if there is one person responsible for insuring that the computers and internet are solid and that the counters have power and are aligned properly.
In the rare case of a failure, the primary problems are as follows.
The problem for your company occurs when we spot a failure and then contact an individual store location and don’t have a central contact. We take busy salespeople away from customers and that is never good, even for just a few moments. Also salespeople typically don’t have a clue about the system and can be somewhat impatient.
We have found that the most successful and happiest dealers are those who have someone keeping a watchful eye on the systems and are able to contact the stores remotely and insure all is well with connectivity even before we spot a problem.
Your TRAX Administrator will receive an email if your traffic counter ever fails for 24 hours. (Note) The traffic counter itself has a 4 day memory and is normally posting the counts to the PC, unless there is a communication issue with the PC. These counts can be retrieved as long as the power has not been turned off.
Please remember, we are always available if there is a problem or a question. Our Direct phone number to Tech Support is (713) 466-7177 and my direct phone number is (713) 854-7706.
We are standing by to assist and train your TRAX Administrator in any every way needed.
Sincerely,
Dave Mink
Use the following checklist to determine the issue with your Traffic Counter. Call our Tech Support at 888-646-5462 if you have any questions or need further assistance.
þ
Power to Mux and Traffic Counter
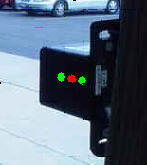
Make sure you
have two solid green lights and one red light on the counter itself and that
these LED’s are pointing into the store and not towards the ceiling.
If you do not have lights go back to the MUX box (about the size of a cell phone
that has three telephone type jacks (RJ-12 female connections) and two
additional ports, one for a power supply cord and one for a 9 pin serial port
that is converted to a USB connection). This box should have a single red light
and if it is not on make sure it is plugged in.
Please note that this power supply should be connected securely to the outlet so
that it cannot be easily or accidentally removed. It is surprising how many
times we will call a store and the traffic counter has been unplugged so that an
employee can charge a cell phone.
þ
Traffic Counter Aligned
Alignment is
based on a series of L.E.D.'s lights located on the side of the beam box mounted
on the door. A traffic counter is aligned properly when the two green LED’s are
glowing solid. It is not aligned properly if Only One Green Light or Lights
are Flickering.
The LED's are activated when the beams are aligned with the strip of reflective
tape, which is provided with the equipment. The green LED's are tied directly
to the receive sensors. Green LED intensity is determined by the amount of
receive signal from the reflector.
To align the Traffic Counter:
1. Plug in RJ-12 connectors at Traffic Counter and Mux.
2. Apply power to the MUX box (serial interface).
3. Before applying the reflective tape to the door, hold it in front of the beams at arms length and move it from side to side so as to see how the green LED’s react.
4. Place the strip on the doorframe first with a piece of scotch tape. This will allow you to make all necessary adjustments before actually sticking the reflector to the doorframe.
5. On the back of the beam box is the setscrew, which will allow the adjustment of the beams from left to right. Never over turn (force) the setscrew. Note: The brightness of the Green LED’s is determined by the amount of reflected infrared signal received.
6. Adjust left and right until the two green LED’s are at their brightest. The goal is to make the two green lights as bright as possible.
7. When passing through the beam the green LED’s should blink in the sequence of direction the customer traveled Once the traffic clears the path between the reflector and the beams, the LED’s will return to the original setting configuration.
Note: The red L.E.D. will always go out for 4 seconds when there is a count.
Alignment Hint: Adjust the the beam by turning the setscrew until the green LED's dim away. Turn adjust in the opposite direction. The green LED's will become very bright then start to dim again. Stop and go back to the brightest point of adjustment. Both Green LED's should equally bright. Once this is completed the beep should only sound when a customer passes inbound.
þ
Cable
Plugged Into Computer
Verify that the
cable running from the Mux to the computer is plugged in at both ends.
Note: The TTWeb software (see below) is configured to point to a specific
USB port. If the USB cable is plugged into a different port then the traffic
counter may stop counting, requiring either movement of cable back to original
port or configuration change in TTWeb.
þ
Internet
Enabled
You must have
Administrative internet access on the Computer to which the Mux is connected.
Note: As long as the Traffic Counter has power you may loose internet for
a period of time and still recover your counts. The Mux has memory that stores
counts for 2-4 days (depending on volume of traffic).
þ
TTWeb
Software Installed and Active on Computer
The TRAX
Traffic Counter has a small software installation on the computer to which the
Traffic Counter is connected. This software is comprised of a Getter program
and a Task Scheduler (that launches the Getter at 5 minutes past each hour).
See below or contact Technical support if all checklist items above pass and
your traffic counter is still not properly collecting or reporting counts.
Installing TT Web
Overview
TT web is designed to work with your front door traffic counter and to provide an auto print feature for the eTRAXsales.com reports. It also is designed to scale down the amount of space that TRAX occupies on your system by removing the need for a local storage database and deliver your information directly to database hosted on the web. The location of the website is: www.eTRAXsales.com
The information stored at this location is password secure by an administrator appointed by you and all information is accessible from anywhere you have internet access.
Requirements
Installation
Must be logged in as administrator
Security settings for scheduler to run on all accounts
To install the TTweb program for TRAXsales go our website at www.traxsales.com go to "My Account" scroll to the bottom of the page and find the hyperlink TTweb. Single click hyperlink and save to your desktop. Once it has finished downloading double click the icon and bring up a "Traxsales" folder. Single click on the folder, right click and select "Copy." Open "My Computer" double click "Local Disk C" double click "Program Files" , go to "Edit" When you select there will be a drop down. Please single click "Paste." Once this is completed find the "Traxsales" folder in that screen, double click and find the TTdetail.exe file and double click. Follow directions below...
Configuration
Selecting the Showroom icon will open the Showroom Details window.
_files/image002.jpg)
There are five fields in this window. Only the first four need to be configured. The field entries are the same as the eTRAXsales configuration setting and this information can be obtained from the eTRAXsales administrator.
It is important for this information be exact and correct in order for Global Networking to perform correctly.
The First Field:
![]()
Once the Dealer ID number is entered the Dealer Name will automatically appear to verify the store name.
The Second Field:
![]()
This field identifies the location and will automatically display the showroom name.
The Third Field:
![]()
The User ID is a set login into the eTRAX website.
Note: In an effort to set this up without the need to use a manager’s password. Your eTRAX administrator can login into eTRAX and create the password PRINT for use in this field.
The Fourth Field:
![]()
This field identifies the number of door counters installed at the location.
The Fifth Field:
![]()
This field is not used.
The configuration is now complete and will now gather door count information and push that data to the web.
Operation
The TRAXweb has two functions. They can be setup on a scheduler or manually executed. These executables are located in C:\Program Files\TRAXsales.
_files/image008.gif)
When selected this executable launches the communication program that calls the door count information from the device installed at the door and transmit that data to the database on the web. This will not interrupt the operation of the system. It will run in the background. The only indication will be on the task bar and takes approximately 30 seconds to complete.
_files/image009.gif)
When selected this executable initiates the default printer to print the reports selected by the eTRAX administrator. Below is an example of the options available in the eTRAX.
_files/image010.jpg)
TASK SCHEDULER
![]()
1. Click this hyperlink Task Scheduler then Open or Save (if you would like to save and install on other TRAX machines), and agree to the terms for Win Zip. If you do not have Win Zip you may copy this free version from our CD or the website. www.TRAXsales.com
2. Install the task scheduler then select Action (top left) then select New Event.
_files/image012.gif)
3. From the Application line select the Browse button at the end of this line and go to Look in and select your C drive (Local Disk C) then please select (double click) Program Files then Select TRAXsales then TTweb.exe. This is a green icon.
4. To insure accuracy in the title line please cut and paste the title TTweb from the Application line. In other words the title should perfectly match the description at the end of your link. Please make sure you remove the letters .exe when you cut and paste.
_files/image014.jpg)
5. Select the Schedule tab on the top left of this screen. and Select Every Hour / Selected Minutes
_files/image015.gif)
6. Change Selected Minutes at the bottom and change from 0 to 5 then please select the Add button.
Also after setting up TTweb they need to hide the system scheduler icon
![]()
Right click the system scheduler select preferences
_files/image019.jpg)
Select the startup/Logging tab, and select Hide tray icon
_files/image021.jpg)
Please note that the computer not only has to be on, but has to be logged into.
Loop Back Tester and identify where the problem is in three easy steps.
_files/image023.jpg)
_files/image025.jpg)
Loop Back Tester Mux Box
TRAX Tester Tool User Guide
The TRAX tester tool easily troubleshoots 3 different devices to see what needs to be fixed and/or replaced.
Testing the Counter
Note: If at any point getter4 does not run through most of the alphabet, the termination or the counter has an issue.
Testing the MUX Box
Testing Serial Cable
If you have any questions at all regarding any part of the installation please do not hesitate to call 713-466-7177 or 888-646-5462
Traffic TRAX Complete Manual (download)
If you are installing The Visual Proof Camera System Please read this next link carefully...
Visual Proof Installation Manual
The following is a short movie to be viewed by the dealer after the traffic counter has been completely installed...
See this short movie which explains exactly how to use the full benefits your new TRAX traffic counter will now provide.
Subject: Setup of your traffic counter system
It looks like the counter system is providing data. I want to explain how the Revenue Per Up Report works and how this new report will provide you some excellent management information.
Revenue Per Up “RPU” is the sales volume represented by every opportunity that comes into a store. Currently the only management information you possess are total sales volume and average sale amount. This report will also provide you the Conversion/Closing ratio and your RPU. The RPU is calculated by dividing the total number of opportunities by the total sales volume for the day.
This Number is by far the best kept secret in retail. It is very powerful because it provides you the true level of customer service you are currently providing and most importantly will give you a true and accurate value of the potential business that each store is capable of.
There are only two ways to improve this number. #1. Increase the average ticket size or…#2. Increase the Conversion/Closing ratio.
The reason this is so important is…For Example:
You have two locations that are virtually identical, same number of salespeople, same type demographics, same consistent sales volume and same average sale. You might discover that one location has a 50% higher RPU than its sister store. If this occurs the fireworks should go off and sirens should sound because if you can identify what the difference is, you have an excellent chance (with good management) to increase the overall sales performance at this location by 50% because the only logical difference is that your conversion ratio is 50% lower than the higher store and possibly you are receiving 50% more traffic and could be understaffed. The bottom line is that if this example were true, you would discover that you had a great opportunity to dramatically improve sales in your company and not increase any other costs (like advertising) in the process.
#1. Please go to www.etraxsales.com and select your company (Dealer Name) enter your user name and password. If you do not have these please email dave@traxsales.com or support@traxsales.com and we will send them to you. Once you have entered the system you are the TRAX administrator and should reset all passwords and user names. Go To <ADMINISTRATION> the select <Security> then simply delete the passwords we have set for you and recreate the new ones that you desire.
#2. Go to <SHOWROOM> and insure that every space is properly filled out and that all phone numbers and most importantly your email address is listed. This will insure that if the traffic counter has stopped for one day that you and our support team receive email notification if there is a system, PC or internet failure. It is important that you insure the box below called TC “Traffic Counter” Failure Notification is selected. Do not select VP Notification unless you invested in the Visual Proof Camera System.
#3. Go to the top right link on www.eTRAXsales.com called <TRAFFIC TRAX REPORTS> then select the fifth item on this drop down called <Revenue Per Up> Select the showroom you want. Make sure you select the showroom name then select EDIT in front of the day on top. This new box allows you to enter the daily sales volume (this should not take more than a couple seconds) and is worth it’s time in gold. If you select monthly this report really comes to life and is very easy to work with for each showroom.
Please call me immediately if you have any questions about these instructions or any other issue regarding TRAX. We are standing by and look forward to providing you the tools to help you with the management of your business.
Our only goal is to assist you in improving performance standards, helping you identify staffing issues and breaking your sales records continually.
Please call my private cell phone number any time for any reason at 713 854-7706.
Warmest regards,
Dave
If you need us to connect to your PC please call us and select this link
Faulty Counting Near a Reflector
J. Dryer 5/17/2010
_files/image026.gif)
With a single outgoing beam and two returned beams (Beam 1 and Beam 2), there is not much overlap immediately adjacent to the reflector. The time that a beam is cut by a person passing the reflector is a measure of the sensitivity of the receptor, e.g. with a very sensitive receptor there may be a signal recognized when three-fourths of the reflector is covered, while with a less sensitive receiver the signal may drop out with one-third of the reflector covered. This is represented above by the wider signal presented by a person passing at a constant speed and interrupting Beam 1 which is assumed to be more sensitive. When the beams are separated in space where Person B passes close to the door monitor, the spatial separation makes this sensitivity difference less important, and the sequence of neither receptor blocked, only receptor 1 blocked, both receptors blocked, only receptor 2 blocked, finally neither receptor blocked recognizable.
Possible solutions are:
1. Move the reflector further from the door.
2. Make the reflector narrower.