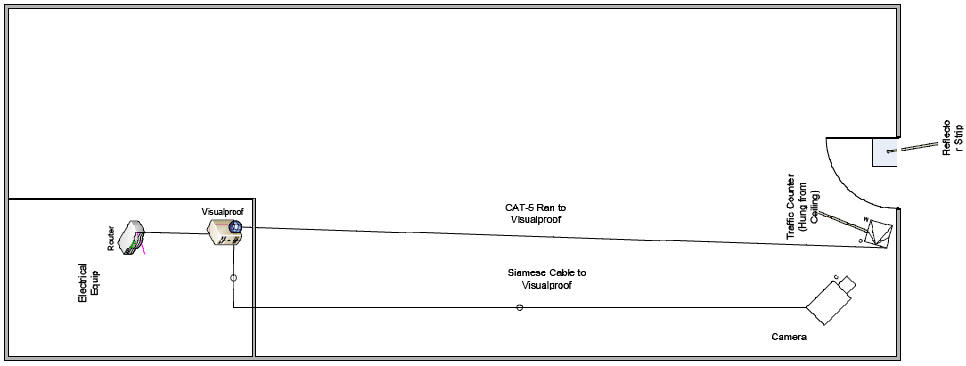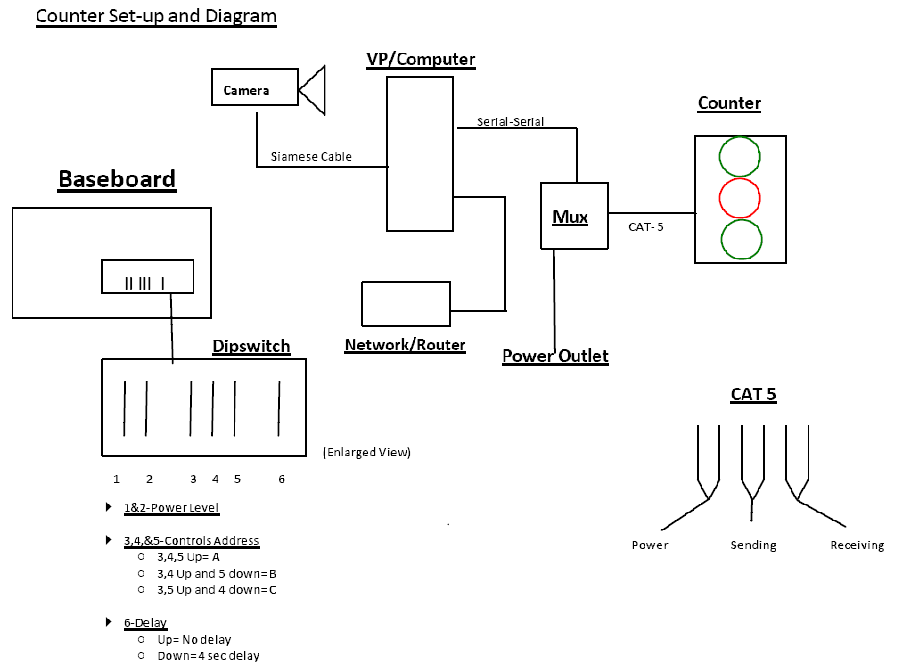
Spec Sheet for HUGO BOSS overhead installation.
We will need a CAT5 wire running from the Ethernet connection to the front door mounting we will be providing.
CAT5 is four pairs, a total of eight wires. We only need three pair but prefer to use CAT5 instead of CAT3 because CAT5 has superior conductivity. When we send our CAT5 we always remove the brown wiring and pre-terminate with RJ-12 connections. Thus if you are running your own CAT5 please follow these simple termination instructions. Terminating Instructions
This CAT5 cable will provide power and all communication needed to operate the traffic counter.
Along with the ceiling mounting system described below we will be sending:
Small Tower PC (Visual Proof Controller) Requiring 110 power
Mux Box (small black box that connects to our VP Controller) Requiring 110 power
Splitter for linking in with existing Camera system along with a 10' Coax Cable so you may connect the existing DVR to the TRAX VP Controller. Make sure you place the VP Controller within 10' of your DVR. If you are purchasing a TRAX Camera please refer to the Original Hugo Boss Installation Document. Click Here
Other than running the CAT5 cable to the front door and providing power and internet access (outbound port 1433) for our Controller and MUX there is nothing else required. The equipment we send is all plug and play.
The installer will need 5-10 minutes with us before they leave the premises so we may verify the camera position at the front door and that internet connection is solid.
If you have any questions please do not hesitate to call.
TRAX support
713.532.1106

Items that are included are:
1-Ceiling Mount
1-Cut Conduit 1/2inch pipe approx 2-4 ft long (or customized length for your location) The ideal height of the traffic counter is approximately 6-12 inches above the height of the open doorway at the corner you feel is best for your installation.
1-Hinging Bracket
2-Screws with locking nuts
1-˝ “slim nut to attach 1/2 inch customized length conduit

.
First fasten the Traffic Counter to the hinging bracket with the two nuts and bolts provided.

Attach the pole to the hinge bracket with the slim nut provided, securing the pole to the through the hole and securing tightly.

.
The cat-5 will run through the conduit and connect to the traffic counter which is ran to the MUX box described in primary instructions.

*ALL LIGHTS SHOULD BE SOLID AT ALL TIMES!!!
*WHEN WALKING THROUGH (entering the store) THE RED LIGHT SHOULD TURN OFF FOR 4 SECONDS. IF IT DOES NOT IT IS NOT ALIGNED!
*HINGE WILL MOVE COUNTER UP AND DOWN; THE SET SCREW (at the back of the counter) WILL MOVE THE LENSE INSIDE COUNTER HORIZONTALLY.
If you are installing this counter for a single door entrance the reflector is placed flat on the floor, even though the angle from the counter is approximately 30 degrees it will still reflect the beam back to the counter.
1. Do not glue down the reflector until you have a good alignment with two solid green lights and a solid red that turns off for 4 seconds
2. Make sure the reflector is glued down in a non-traffic area.
Double Door Configuration
If you have a two door counter you will need to install a device which will reflect the beams back at a 10-30 degree angle. If you are working with a double door we will provide a reflector which Please do not glue this down until you have a good alignment and know exactly where you want to install the reflector.
You may have a couple options depending on the type of double door we are dealing with.
Do the doors open in or out? Should you mount the reflector to the floor or on the door frame? Where can it best be installed so the reflector does not interfere with the door or the looks of the entryway?
Remember do not remove the adhesive backing until you are sure of the location for permanent install and that you have a solid alignment. If you are attaching to a door frame us scotch tape to


Please call us if you have any questions.
TRAX support
713.532.1106